A simple guide to getting started with testing your React components
In this guide, we will take a look at unit testing our React App components. I have prebuilt a simple Todo App using React. Firstly, we will go through the overall app architecture to understand the functionality and what each component in the app is responsible for. After that, we will unit test each of our components.
Prerequisite
To follow along with this guide, you must have a basic understanding of how to build apps using React as we will not be discussing this aspect in detail. I also assume that you have basic familiarity with testing and jest in general.
Goal
The main goal of this guide is to learn unit testing react components by adding tests for our demo app. We will be diving deeper into component unit testing using the Jest framework and react-testing-library (RTL).
Why react-testing-library (RTL)?
RTL is quickly rising in popularity as an alternative to Enzyme. I felt it has a much simpler and intuitive API compared to Enzyme.
According to its author, Kent C Dodds, react-testing-library is
A simpler replacement for enzyme that encourages good testing practices.
The main philosophy behind this library is that it encourages you to test your app in a way that resembles the way your app is used, rather than testing the implementation itself. In the long term, the app’s implementation may change, but you want to make sure that the user experience doesn’t break.
Another advantage is, react-testing-library comes out of the box with create-react-app, starting from version 3.3.0, so no additional effort spent in setting things up.
Brief Overview of the App -
Here I will be discussing the overall architecture of the app and highlight the main parts. For the full source code, feel free to follow the links -
App Setup -
I have used the latest version of create-react-app (CRA) i.e. 3.4.1 as of this writing. Only a couple of additional packages are added to the project -
- semantic-ui which is a CSS framework for some ease in styling.
- uuidv4 - To auto-generate unique ids
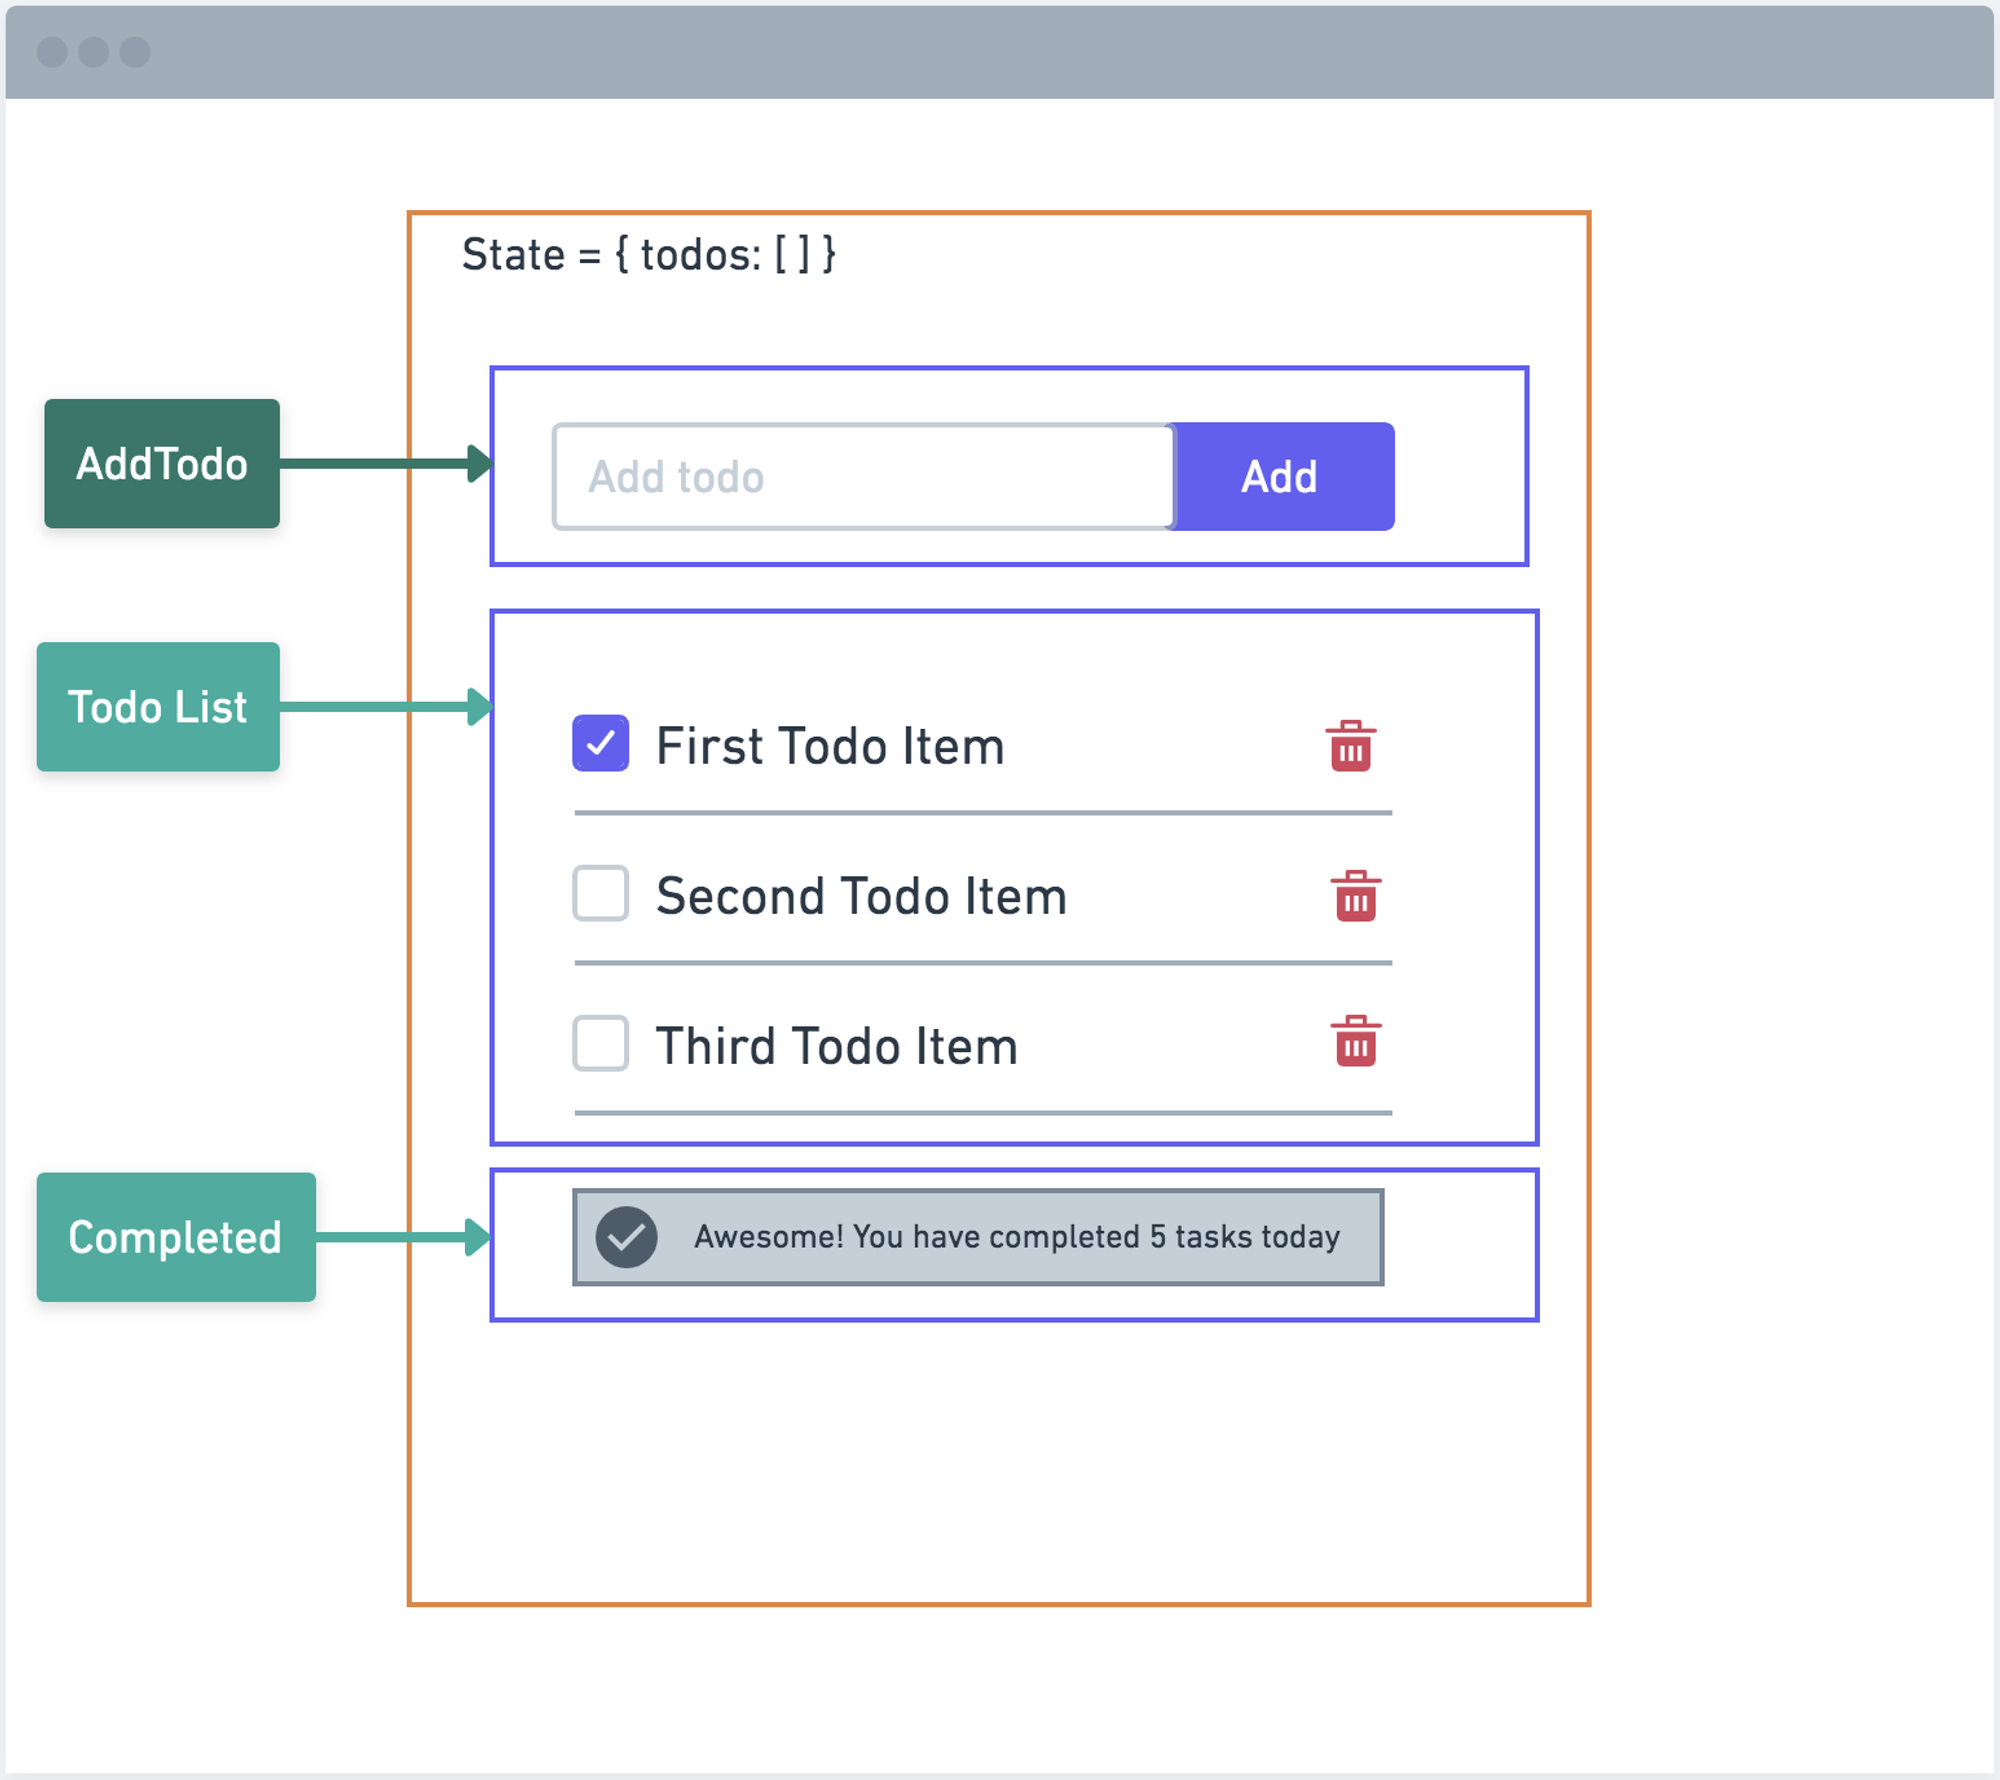
As you can see from the visual below, we have 4 components -
- AddTodo - An input form to add the new todo. When app loads, this field needs to have the focus for better UX.
- TodoList - Displays the list of todos.
- TodoListItem - A single todo item that contains a checkbox and a delete button.
- Completed - A read-only component that displays the total number of tasks remaining, total tasks completed and then based on these stats, displays a different message.
The below visual will give you an idea about the component hierarchy and state management within the app. Since the three components - AddTodo, TodoList, and Completed are siblings and they all need to have access to the common state, we keep the main state in the App component.
Let’s test -
Now that we have an overall idea about the app behavior and the architecture, its time to dive into testing. When the app loads, the only component we see is the input form. So, let’s start with this component.
By default jest looks for __tests__ directory or <filename>.test.(js|jsx). For the purposes of this demo, we will create a directory called __tests__ under components folder. We will add the file add-todo.js under this folder and write all the tests for component here.
import React from "react";
import { render } from "@testing-library/react";
import AddTodo from "../add-todo";

test("AddTodo renders without crashing", () => {
  render(<AddTodo />)
});
Since this is our first test, we will keep things simple and just test if our component mounts without crashing or any other issues. To achieve this, we use render() method from react-testing-library which mounts our component.
In our terminal, let us start our test in watch mode so each time we add new tests or save any code, the tests will run automatically.
npm t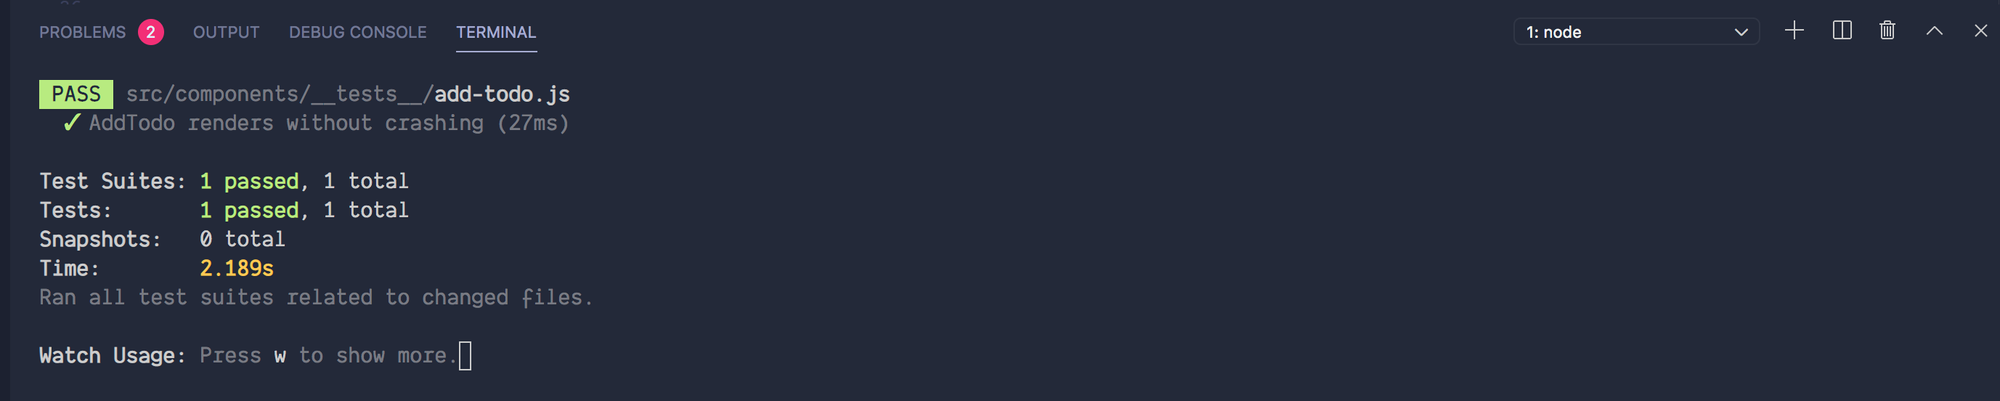
Congratulations, now your first test passed successfully which means our component mounts without any issues.
Moving on, think from the user’s perspective, if you remember from before - as a part of our app’s UX requirement, we add focus on the input field as soon as the component mounts. Let’s add a test to make sure this works as intended.
import React from "react";
import { render, screen } from "@testing-library/react"; // highlight-line
import AddTodo from "../add-todo";

test("AddTodo renders without crashing", () => {
  render(<AddTodo />)
});

test("AddTodo contains input field and it has focus on mount", () => {
  render(<AddTodo />);
  const inputField = screen.getByPlaceholderText("Add a new todo");
  expect(inputField).toHaveFocus();
});
Similar to our first test, we mount the component first. To check if the input field has the focus, we need some way to target the input field. React-testing-library provides us with a bunch of queries which are similar to DOM selectors.
One thing to note is, in the list of queries, you will not find queries that enable you to select the element using either an id or classname. Initially, this completely threw me off as this was something I expected by default. Upon reading more, I realized, that this is by design. Generally, id and classes are used by developers for styling related purposes. Users don’t care about them.
The queries provided by the library are designed in a way that also helps you test what users see - for example, getByPlaceholderText, getByText, getByAltText and if you think about screen readers or similar devices, the queries also include getByRole. This is how, the library encourages you to follow best practices. Brilliant!
In this case, because we are accessing the input field, I chose to use the query getByPlaceholderText. screen is like the container in which we look for this element, similar to document.body.
Now that we have grabbed that element and stored in a variable, we can run some assertions on it. For this test, we only need to check if the input field has the focus —
expect(inputField).toHaveFocus();If you are familiar with Jest, you must be wondering where toHaveFocus() comes from. This comes from the package jest-dom which is also included in @testing-library as a part of the package.
If you open the file setupTests.js you will see this line -
import '@testing-library/jest-dom/extend-expect';This is responsible for extending the default expect() method with all the DOM specific assertions.
So, with our new test in place, let check the terminal.

To summarize, so far we have confirmed that our AddTodo component is mounting without any issues and our input field has the focus as expected. Moving further, thinking in terms of the user journey, what are the possible interactions?
I see two possible scenarios -
- Users can press Enter key / click on the “Add” button without adding any text.
- Users can add text in the field and click “Add”.
Let's test both of these cases -
In our component’s handleSubmit method, we have a check to see if the input field has value. If there is no value, we prevent the data from being added to the state because of course we don’t want to see any blank rows/items in our list. This means, that we prevent the add method from being called.
const handleSubmit = (event) => {
  event.preventDefault();
  if (!inputRef.current.value) return;
  add({ id: uuid(), content: inputRef.current.value, completed: false });
  inputRef.current.value = "";
};
For testing this case, we need to have access to the add method, so let's start writing our test -
test("Form submission should not call add method if input field is empty", () => {
  render(<AddTodo />);
  const btn = screen.getByText(/add/i);
});
So far, I have mounted our component, and this time, I want to select our button so we can somehow simulate ‘user clicking on the button’ to add a new todo. If you notice, this time, I am using getByText query which will select the button by text, and then I pass regex with case insensitive flag /i to avoid making our test brittle.
To simulate the user events, we can import a utility called fireEvent from the RTL and also pass the add method as props to our component similar to our implementation. So now our test file looks like this -
import React from "react";
import { render, fireEvent, screen } from "@testing-library/react"; // highlight-line
import AddTodo from "../add-todo";

test("AddTodo renders without crashing", () => {
  render(<AddTodo />)
});

test("AddTodo contains input field and it has focus on mount", () => {
  render(<AddTodo />);
  const inputField = screen.getByPlaceholderText("Add a new todo");
  expect(inputField).toHaveFocus();
});

test("Form submission should not call add method if input field is empty", () => {
  render(<AddTodo add={add} />);
  const btn = screen.getByText(/add/i);
  fireEvent.click(btn); // highlight-line
});
Now the question is, where are we getting the add method from. In our actual implementation, that method was passed from the parent component, but since in this case, we are testing <AddTodo /> component in isolation, we don’t have access to any of the methods from the parent.
In this case, we will mock the add method and call it mockedAdd just to make it clear for other developers.
Jest provides us with a very simple way to mock a method. In this case, we can just mock it like this -
const mockedAdd = jest.fn();After adding an assertion on this mocked function, here’s what our test becomes -
test("Form submission should not call `add` method if input field is empty", () => {
  const mockedAdd = jest.fn() // highlight-line
  render(<AddTodo add={mockedAdd} />);
  const btn = screen.getByText(/add/i);
  fireEvent.click(btn);
  expect(mockedAdd).not.toHaveBeenCalled(); // highlight-line
});
When you mock a function in jest, that function comes with several handy properties which can then be used to check things like - if the function was called or not, how many times the function was called and what arguments the function was called with.
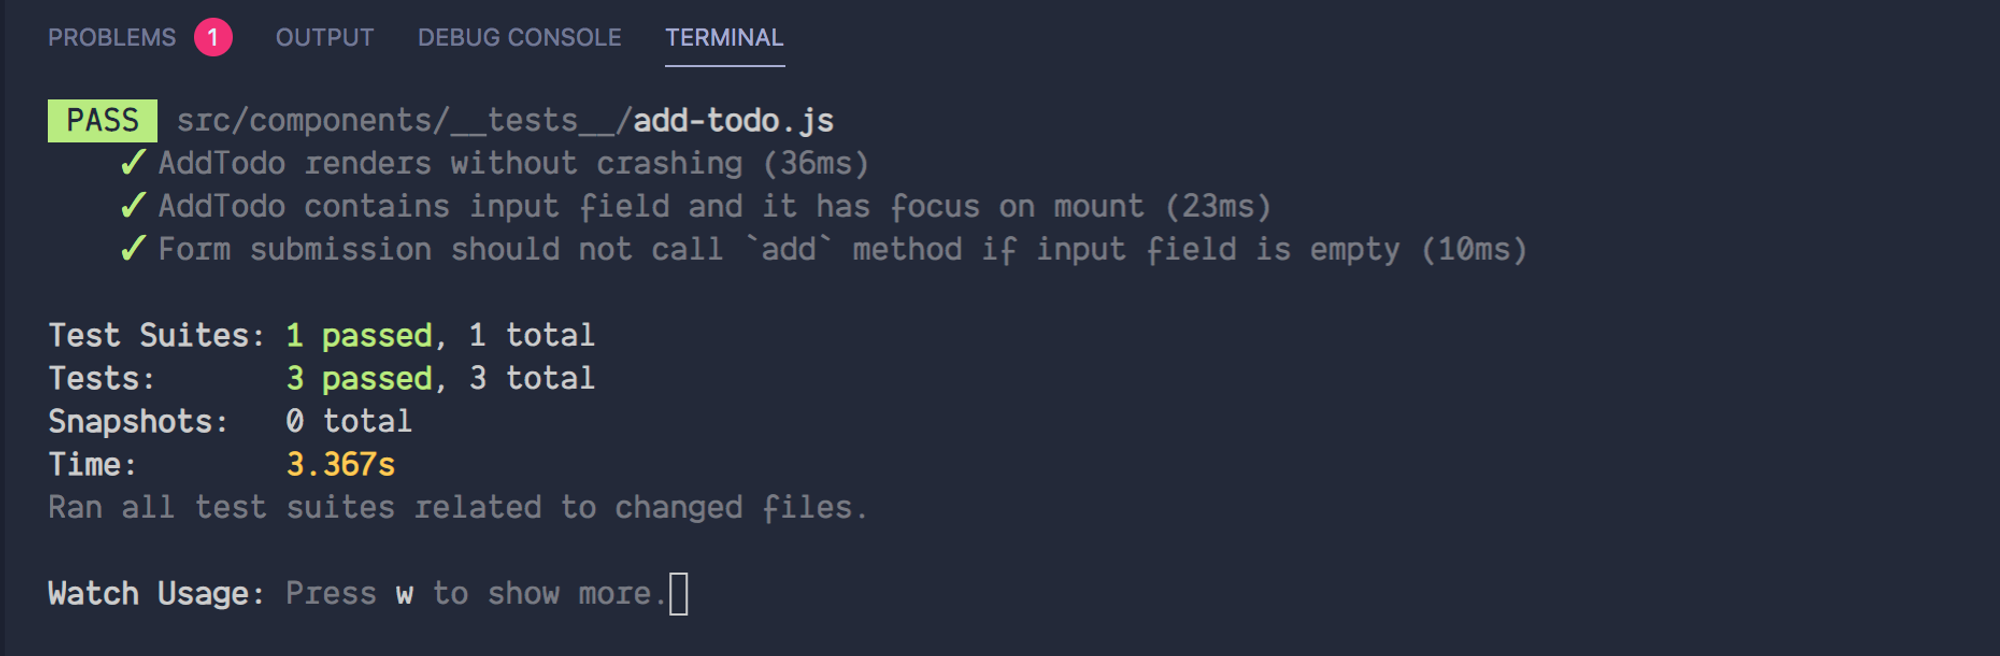
At this point, if everything went correctly, we should see 3 passing tests -
Let’s now, test our only other possible interaction i.e. User adds the text in the field and clicks “Add”. In this case, we want to test that our previous mock function was called and it was called with the right value.
test("Form submission should go through successfully", () => {
  const mockedAdd = jest.fn() // highlight-line
  render(<AddTodo add={mockedAdd} />)
  const input = screen.getByPlaceholderText("Add a new todo");
  const btn = screen.getByTestId("submit-btn");

  fireEvent.change(input, { target: { value: "grocery" } });
  fireEvent.click(btn);

  expect(mockedAdd).toHaveBeenCalledTimes(1);
});
Adding up everything that we have learned so far, I hope this test now makes sense. The only thing different so far in this test is, we fire an onChange event on the input and add its value as the second argument. The added value is similar in structure to how we get event.target.value.
We now run an assertion on this mocked function to make sure that it was called once.
If you now check your test, it should pass successfully. You might decide to end your tests for this component here and call it a day. That would be fine. But you can also go a step further and check the arguments passed to make sure correct values were sent.
test("Form submission should go through successfully", () => {
  const mockedAdd = jest.fn() // highlight-line
  render(<AddTodo add={mockedAdd} />)
  const input = screen.getByPlaceholderText("Add a new todo");
  const btn = screen.getByTestId("submit-btn");

  fireEvent.change(input, { target: { value: "grocery" } });
  fireEvent.click(btn);

  expect(mockedAdd).toHaveBeenCalledTimes(1);
  expect(mockedAdd).toHaveBeenCalledWith({}) // highlight-line
});
If you now take a look at the terminal, you will see that now your test is failing and if you inspect the issue, you should see something similar.
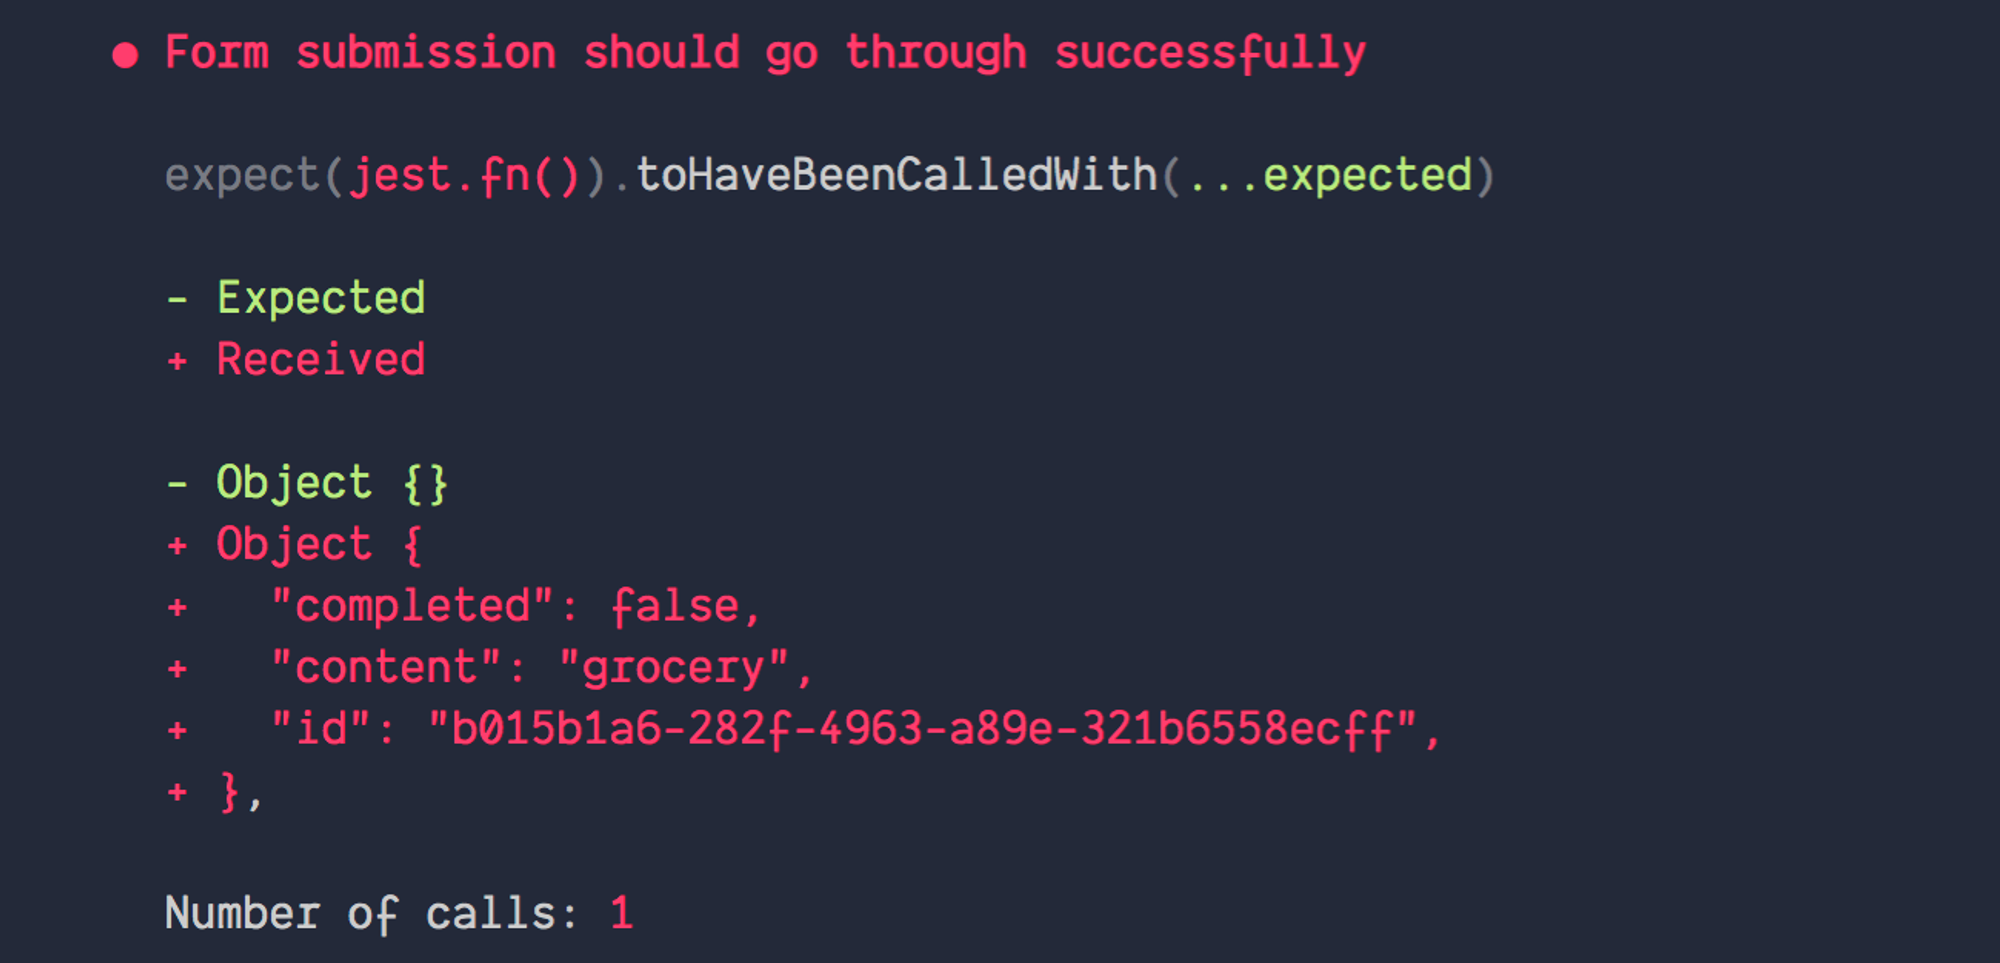
If you take a look at our implementation, we send the object with 3 properties - a unique id, content (which is our value from input), and a boolean check that is initially set to completed: false.
Fair enough, we have an easy solution here, let's just copy everything inside the Received object value in red and paste it in our test. That way the expected and the received value would match and our test will pass.
But wait…
If you check the id property carefully, you would notice that this string looks different from what you see on your computer. Not just that, but every time I hit save, the received object id would be completely different.
This id comes from the package called uuidv4. All this package does is, it returns a unique id that we can use in our app. To make the test pass, our solution is to mock the package itself. What that means is, we intercept the call to uuid() and return our hard-coded values which we can then use to match in our test.
The way we do that is by using jest.mock() method
jest.mock('uuidv4', () => {
 return { uuid: () => '1234' }
});
As the first argument, we provide it the path to the package, in this case, since it is a node module, we just pass the name of the package. The second argument is the callback that returns the object containing uuid method. This method only returns our hardcoded string i.e. 1234 in this case. Now this helps make our test deterministic.
Now let’s use this to pass our test -
jest.mock('uuidv4', () => {
  return { uuid: () => '1234' }
});

test("Form submission should go through successfully", () => {
  const mockedAdd = jest.fn() // highlight-line
  render(<AddTodo add={mockedAdd} />)
  const input = screen.getByPlaceholderText("Add a new todo");
  const btn = screen.getByTestId("submit-btn");

  fireEvent.change(input, { target: { value: "grocery" } });
  fireEvent.click(btn);

  expect(mockedAdd).toHaveBeenCalledTimes(1);

  expect(mockedAdd).toHaveBeenCalledWith({
    id: "1234",
    content: "grocery",
    completed: false,
   })
});
Now we should see that this test has also passed correctly. One last thing, I would check is what happens after the todo item is submitted successfully. We don’t care about the parent component’s state at this point. We only care about .
After successful submission, we clear the input field. Let’s add that assertion within this test itself.
expect(input).toHaveValue("");Finally, this is what our test file looks like -
import React from "react";
import { render, fireEvent, screen } from "@testing-library/react"; // highlight-line
import AddTodo from "../add-todo";

jest.mock('uuidv4', () => {
  return { uuid: () => '1234' }
})

test("AddTodo renders without crashing", () => {
  render(<AddTodo />)
});

test("AddTodo contains input field and it has focus on mount", () => {
  render(<AddTodo />);
  const inputField = screen.getByPlaceholderText("Add a new todo");
  expect(inputField).toHaveFocus();
});

test("Form submission should not call add method if input field is empty", () => {
  const mockedAdd = jest.fn() // highlight-line
  render(<AddTodo add={mockedAdd} />)
  const btn = screen.getByText(/add/i);
  fireEvent.click(btn); // highlight-line
});

test("Form submission should go through successfully", () => {
  const mockedAdd = jest.fn() // highlight-line
  render(<AddTodo add={mockedAdd} />)
  const input = screen.getByPlaceholderText("Add a new todo");
  const btn = screen.getByText(/add/i);

  fireEvent.change(input, { target: { value: "grocery" } });
  fireEvent.click(btn);

  expect(mockedAdd).toHaveBeenCalledTimes(1);

  expect(mockedAdd).toHaveBeenCalledWith({
    id: "1234",
    content: "grocery",
    completed: false,
   })

  expect(input).toHaveValue("");
});
If you have followed along so far and can see all your tests passing, Great job! You now have a solid suite of tests for your component and you can now go to bed with a peaceful mind.
Before we move on to testing our other components, I want you to take a look again at our test file. Don’t you feel like a lot of the code is duplicated? For example, render method, i.e., we are mounting the same component several times. Our mocked add method has been duplicated a couple of times.
Let’s try to refactor. I will put down the refactored code for the complete file and then we will go through the different parts.
import React from "react";
import { render, fireEvent, screen } from "@testing-library/react";
import AddTodo from "../add-todo";

const mockedAdd = jest.fn();

jest.mock("uuidv4", () => ({
  uuid: () => "1234",
}));

describe('AddTodo', () => {
  beforeEach(() => {
    render(<AddTodo add={mockedAdd} />)
  })

  test("It contains input field and it has focus on mount", () => {
    const inputField = screen.getByPlaceholderText("Add a new todo");
    expect(inputField).toHaveFocus();
  });

  test("Form submission should not call `add` method if input field is empty", () => {
    const btn = screen.getByText(/add/i);
    fireEvent.click(btn);
    expect(mockedAdd).not.toHaveBeenCalled();
  });

  test("Form submission should go through successfully", () => {
      const input = screen.getByPlaceholderText("Add a new todo");
      const btn = screen.getByText(/add/i);

      fireEvent.change(input, { target: { value: "grocery" } });
      fireEvent.click(btn);

      expect(mockedAdd).toHaveBeenCalledTimes(1);
      expect(mockedAdd).toHaveBeenCalledWith({
        id: "1234",
        content: "grocery",
        completed: false,
      });

      expect(input).toHaveValue("");
  });
});
As you can see from the code above, we now wrap our entire test suite in a single describe block. We then added beforeEach() method, which is a lifecycle hook and it runs before each test. We make sure to mount our component in that.
We also mocked our functions at the top so each test will have access to them. This way we have reduced the duplication.
Try switching the order of test 2 and test 3, and notice what happens -

Why in test 3, instead of not calling add method, it has been called once? The reason is that we ran tests on the mocked function in test 2, where it was called once and now in test 3, even though this is not getting called, it has the number of times called registered to 1. To solve this issue, we need to restore the mock function somehow and prevent this kind of leakage.
Similar to beforeEach hook, we also have afterEach which is ideal for restoring our mocked methods to its original state. So let's add it in our file -
import React from "react";
import { render, fireEvent, screen } from "@testing-library/react";
import AddTodo from "../add-todo";

const mockedAdd = jest.fn();

jest.mock("uuidv4", () => ({
  uuid: () => "1234",
}));

describe('AddTodo', () => {
  beforeEach(() => {
    render(<AddTodo add={mockedAdd} />)
  });

// highlight-start
  afterEach(() => {
    mockedAdd.mockClear();
  })
// highlight-end

  test("It contains input field and it has focus on mount", () => {
    const inputField = screen.getByPlaceholderText("Add a new todo");
    expect(inputField).toHaveFocus();
  });

  test("Form submission should go through successfully", () => {
    const input = screen.getByPlaceholderText("Add a new todo");
    const btn = screen.getByText(/add/i);

    fireEvent.change(input, { target: { value: "grocery" } });
    fireEvent.click(btn);

    expect(mockedAdd).toHaveBeenCalledTimes(1);
    expect(mockedAdd).toHaveBeenCalledWith({
      id: "1234",
      content: "grocery",
      completed: false,
    });

    expect(input).toHaveValue("");
  });

  test("Form submission should not call `add` method if input field is empty", () => {
    const btn = screen.getByText(/add/i);
    fireEvent.click(btn);
    expect(mockedAdd).not.toHaveBeenCalled();
  });

});
mockClear method is added by jest whenever you mock any function. Now with this implementation, you are free to change the order of any tests, and that should not break the tests.
If you now run the command
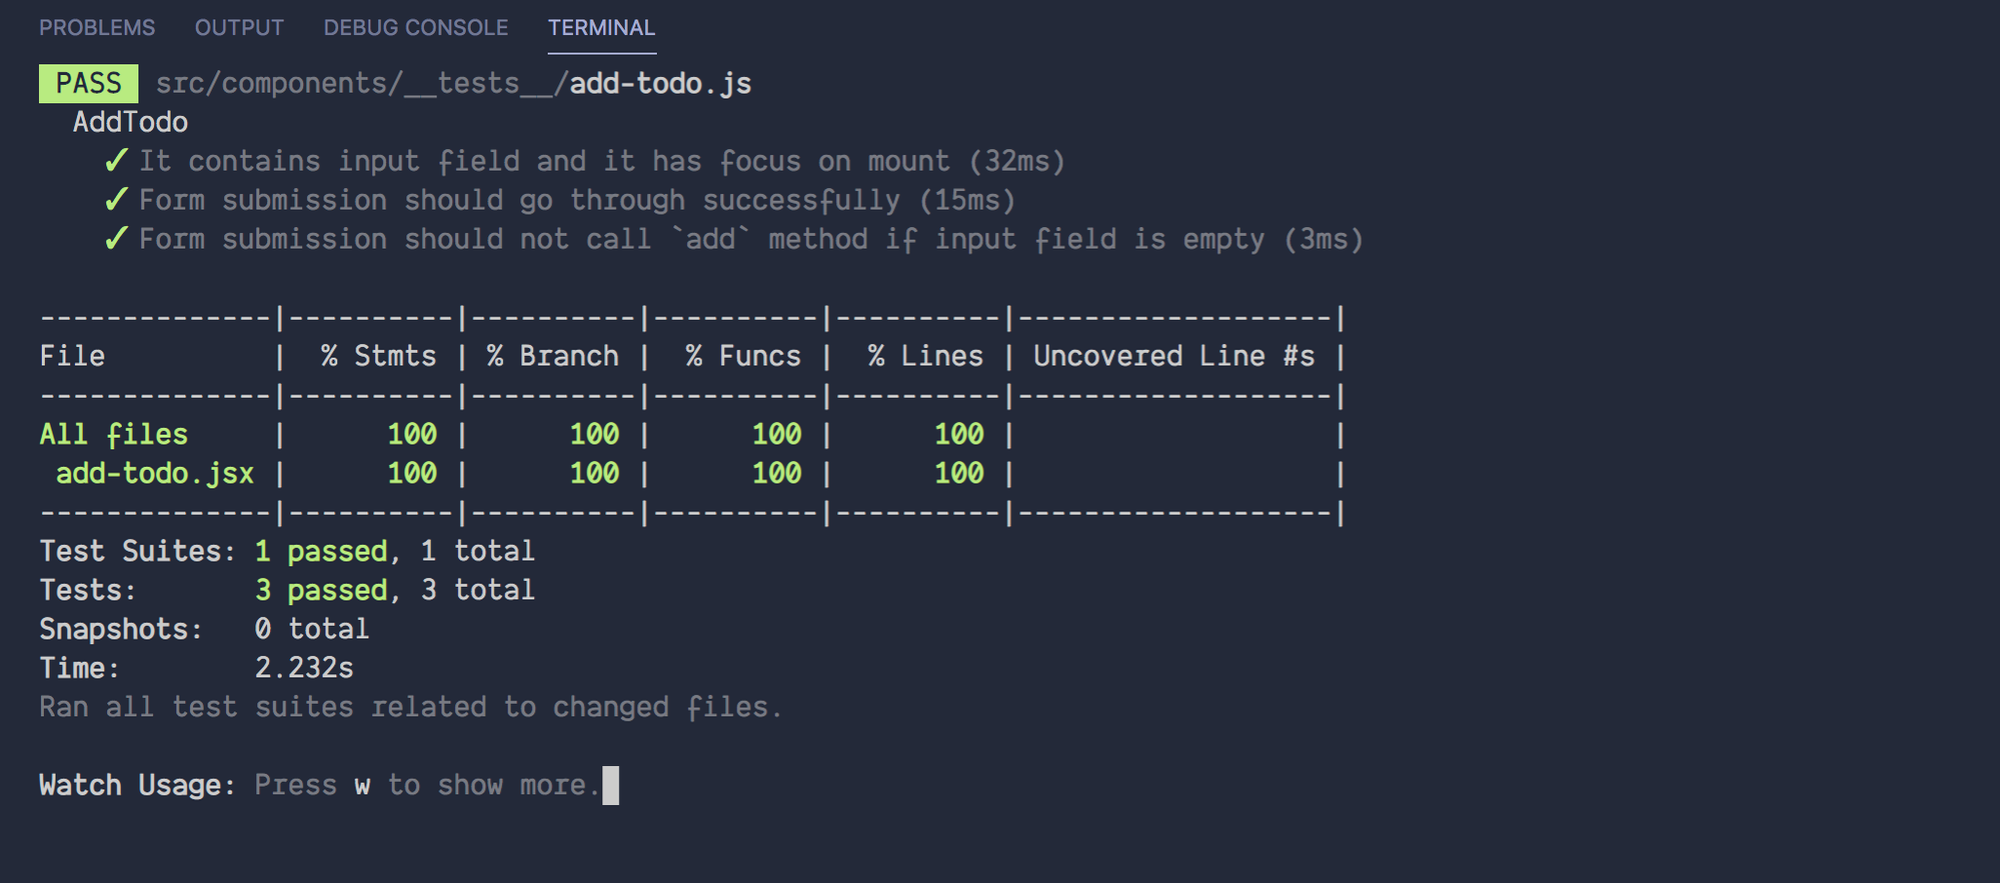
npm t -- --coverageIt will generate the coverage report. As can be seen from the report, we have covered 100% of the code for the <AddTodo /> component.
When you ran the coverage command in the terminal, it also generated the coverage report in your filesystem, under the directory coverage in your project's root. This directory contains an .html file of the report, so you can view it in the browser. Simply using this command in the terminal will pop open the report in the browser -
And you will be presented with an interactive report like this -
Good job so far! We have come a long way. It might seem a little exhausting at first, but we have covered a lot of new concepts thus far. Moving further, we will be reusing these concepts to add tests for our other components, hence the remaining part will hopefully be much shorter.
Todo List Item
Let's test our list item. I am skipping through the TodoList component for now since all it only maps over an array of list items and render them.
Our TodoListItem component has couple of different interactions -
- When the user clicks either on the checkbox or the label, it marks the item complete.
- When the user clicks on the delete button, it removes the item from the list.
Following our earlier approach, I created a new file todo-list-item.js under __tests__ directory. After writing the tests, here is what the test file looks
import React from "react";
import { render, fireEvent, screen } from "@testing-library/react";
import TodoItem from "../todo-list-item";

const mockedTodo = {
  id: "1234",
  content: "grocery",
  completed: false,
};

const markCompleted = jest.fn();
const deleteTodo = jest.fn();

describe('Todo List Item', () => {
  beforeEach(() => {
    render(
      <TodoItem
        todo={mockedTodo}
        markCompleted={markCompleted}
        deleteTodo={deleteTodo}
      />)
  });

  afterEach(() => {
    markCompleted.mockClear();
    deleteTodo.mockClear();
  });

  test("Todo is marked completed on checkbox click", () => {
    const checkbox = screen.getByLabelText(mockedTodo.content);
    fireEvent.click(checkbox);

    expect(markCompleted).toHaveBeenCalledTimes(1);
    expect(markCompleted).toHaveBeenCalledWith(mockedTodo.id);
  });

  test("Todo item to be deleted on click of delete button", () => {
    const deleteBtn = screen.getByTestId("delete-btn");
    fireEvent.click(deleteBtn);

    expect(deleteTodo).toHaveBeenCalledTimes(1);
    expect(deleteTodo).toHaveBeenCalledWith("1234");
  });
})
Just like before, we mocked the two methods which are passed into the component through props - markCompleted and deleteTodo. Inside the beforeEach hook, I mounted the component, and inside our afterEach hook, I restore the mock functions to avoid any leakage between the tests.
For the two possible interactions that the user can have with this component i.e. mark complete and delete, I wrote the two tests. Just from reading through the code for the above tests, you should be able to make sense of what is happening.
One thing to note here is, in my second test, I have used the query getByTestId. To use this query, I have added a data- attribute on the delete button element.
<button
  data-testid="delete-btn" // highlight-line
  className="ui button icon red"
  onClick={() => deleteTodo(todo.id)}
>
  <i className="trash icon"></i>
</button>
Now with this new test suite in place, let's run
npm t -- --coverageYou will then notice both of our tests are passing successfully. Awesome!
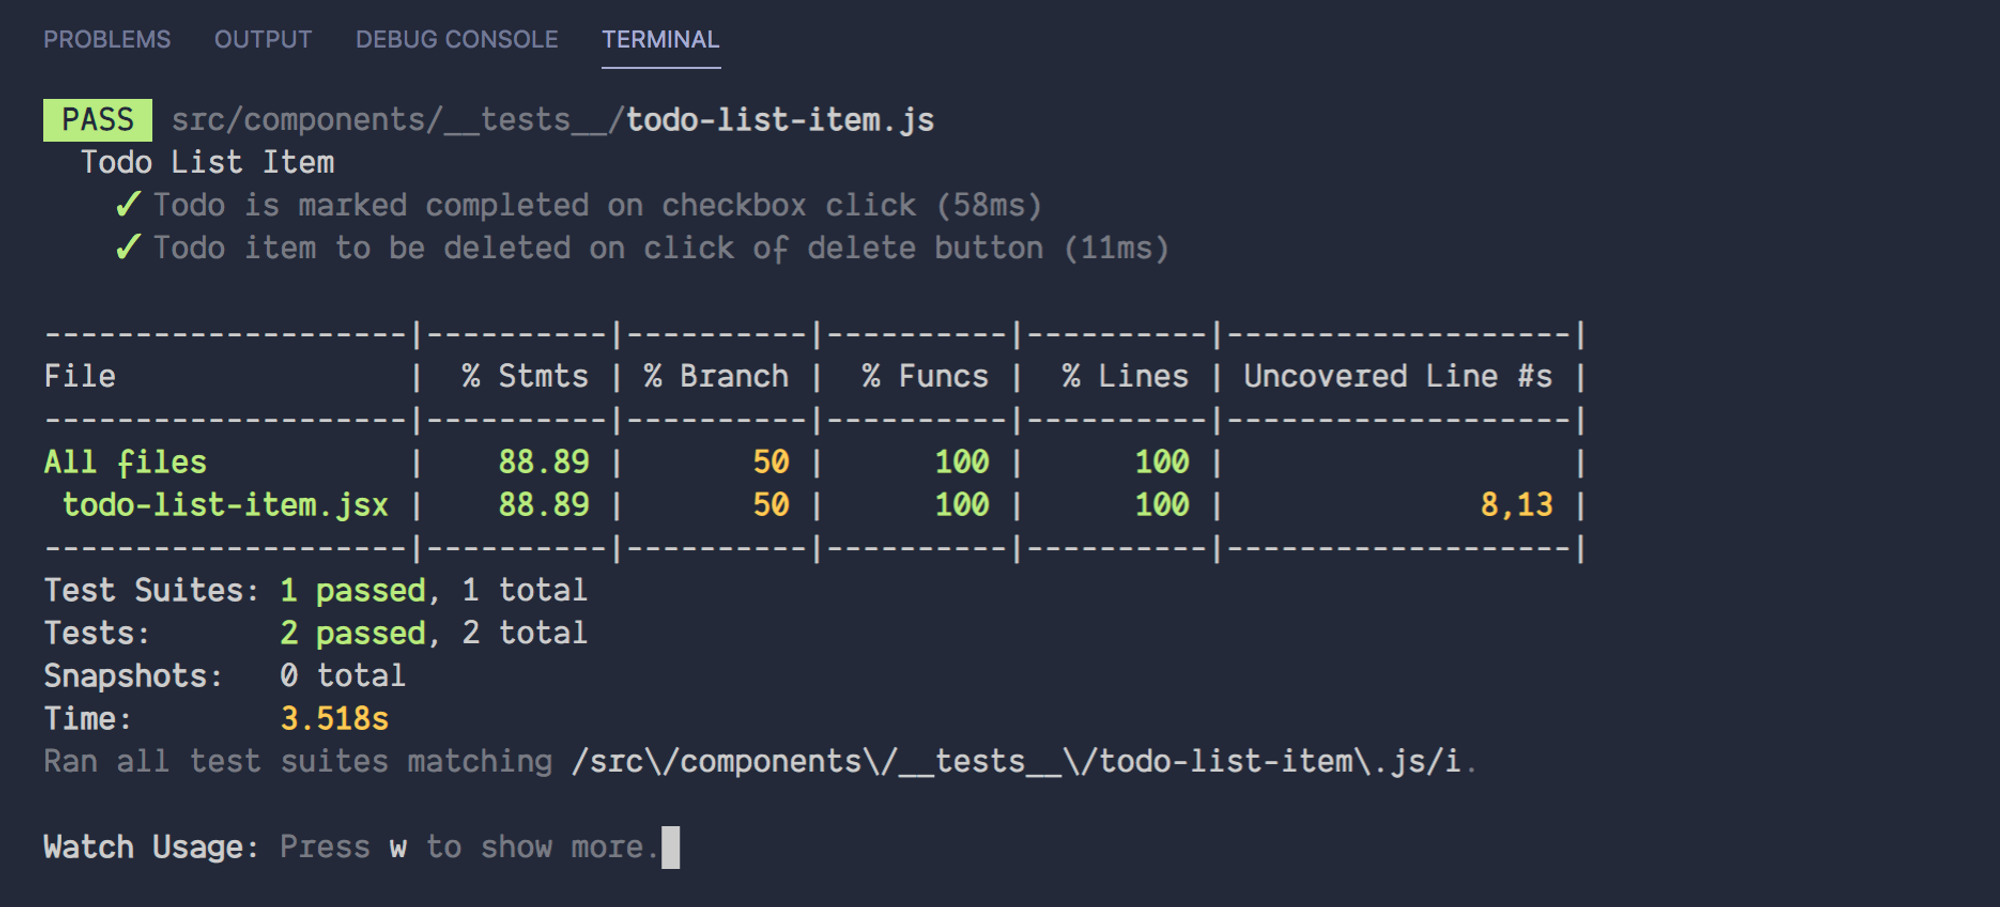
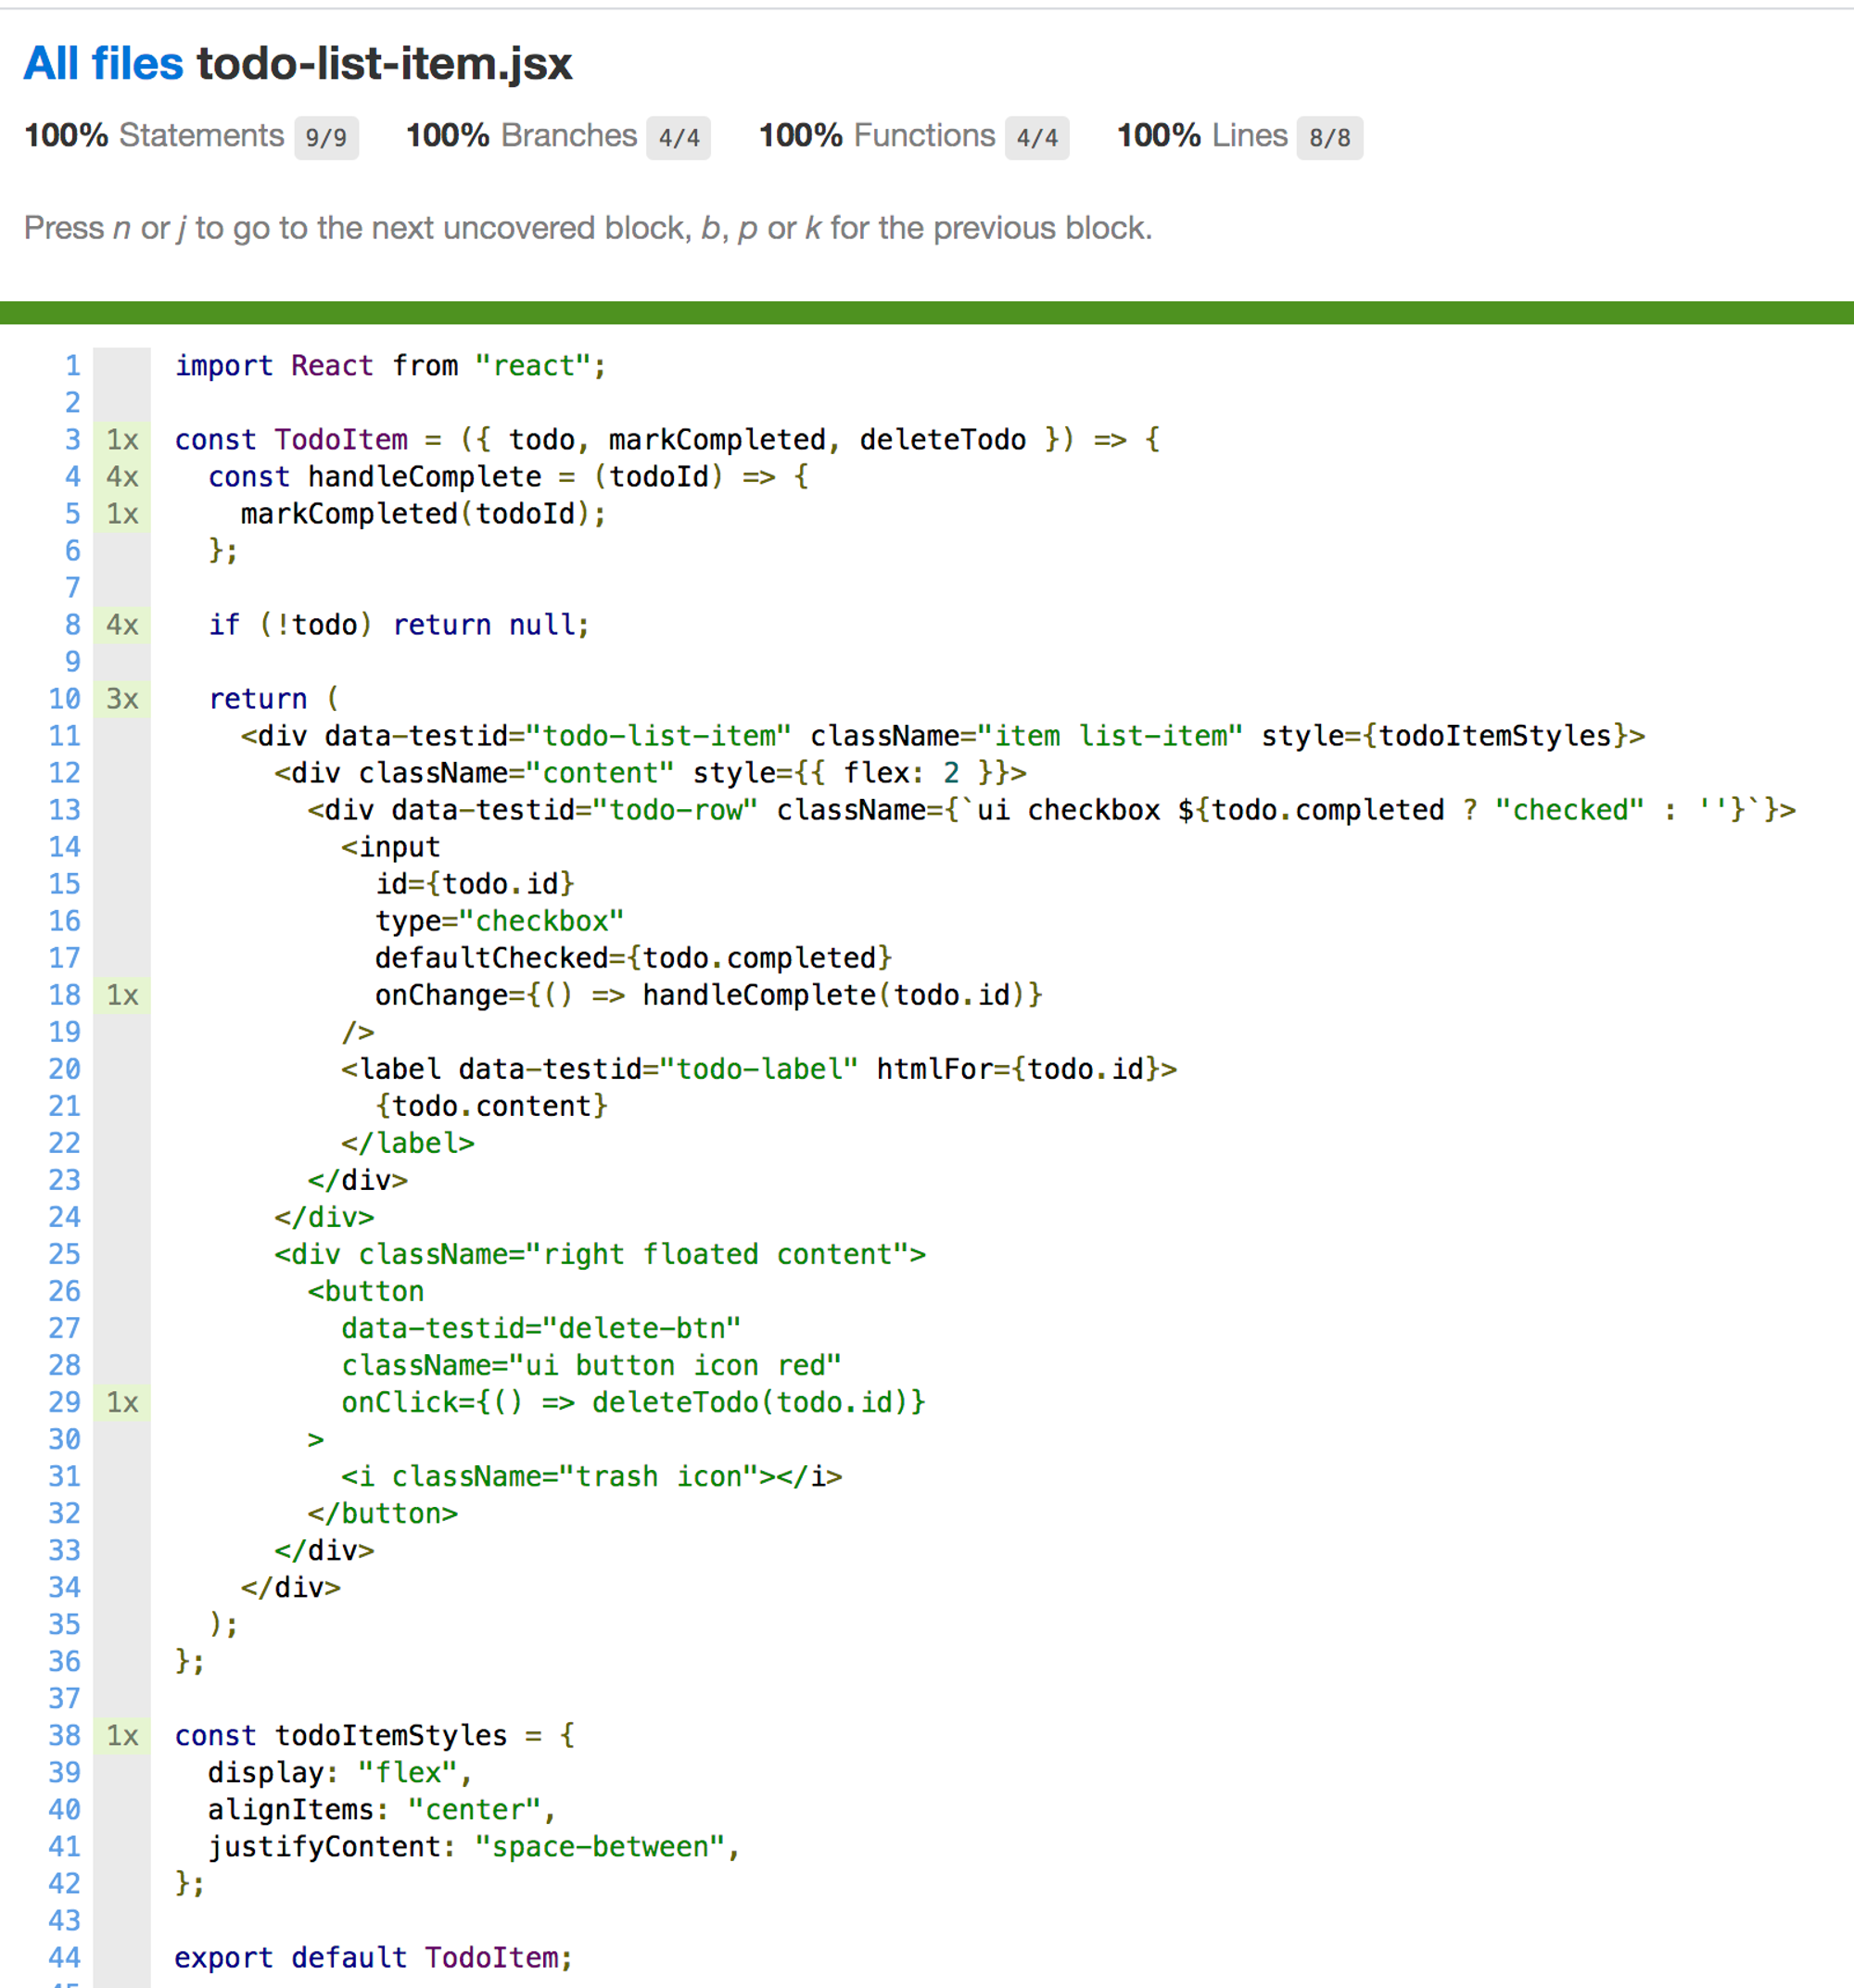
But wait, if you notice in the coverage report, you will see two lines are uncovered - 8, 13. Let's try to dig deeper, open up the coverage report in an interactive UI so we can see the details.
open coverage/lcov-report/index.html
In this report, we can now clearly see the highlighted parts of the code that were not tested. We have missed out on testing two conditions - if the data is not available, we should return null and when the item is marked completed, the row should contain the class checked since our styling depends on this.
Cool, let's add the tests to cover 100% of our code.
For the first condition, where our todo prop receives null, we will need to once again mount the component with the todo={ null } prop. Then we will query if the list-item is present. For this, I have added a data-testid to this element, so we can query can see if this element is present on the document.
<div
  data-testid="todo-list-item"
  className="item list-item"style={todoItemStyles}
>
In our test file, I add this new test above Todo List Item describe block.
test('Todo list item not to be rendered when todo prop has value null', () => {
  render(<TodoItem todo={null} />);
  expect(screen.queryByTestId('todo-list-item')).not.toBeInTheDocument();
});
As you can see here, we are using queryBy query type instead of getBy, since getBy would throw an error if it doesn't find this element. And if you were running your tests in watch mode with coverage on, you will see that it now shows only one uncovered line.
Let us write the test to make sure if the item is marked complete, we have the class name checked on the row. For this assertion, instead of writing a separate test, I would add it to our first test where we make assertions for item marked completed.
test("Todo is marked completed on checkbox click", () => {
  const checkbox = screen.getByLabelText(mockedTodo.content);
  fireEvent.click(checkbox);

  expect(markCompleted).toHaveBeenCalledTimes(1);
  expect(markCompleted).toHaveBeenCalledWith(mockedTodo.id);
  expect(checkbox).toBeChecked();
  expect(screen.getByTestId('todo-row')).toHaveClass('checked');
});
Now if you see, your tests are failing on the assertion - where we check for the checked class.
Expected the element to have class:
      checked
    Received:
      ui checkbox

      39 |     expect(markCompleted).toHaveBeenCalledWith(mockedTodo.id);
      40 |     expect(checkbox).toBeChecked();
    > 41 |     expect(screen.getByTestId('todo-row')).toHaveClass('checked');
         |                                            ^
      42 |   });
      43 |
      44 |   test("Todo item to be deleted on click of delete button", () => {

      at Object.test (src/components/__tests__/todo-list-item.js:41:44)
So, what's happening here? Why aren't we getting the checked class as expected? If you really think about the way React works, this is how the flow would go -
- User checks the checkbox to mark complete.
markCompletedfunction is called which updates the state in the parent component.
- This update then triggers the component rerender which also rerenders all the children and updates the UI accordingly.
We need to follow this flow. In our test, we need to somehow rerender our component in order to see the checked class. To do this, we will use the utility rerender which is returned from render method.
The render method returns an object that has a few properties - queries (same as what we have been using with screen.), debug, rerender etc. For the full list, you can checkout the documentation.
Let's make the necessary changes to our tests so we can use this -
import React from "react";
import { render, fireEvent, screen } from "@testing-library/react";
import TodoItem from "../todo-list-item";

const mockedTodo = {
  id: "1234",
  content: "grocery",
  completed: false,
};

const markCompleted = jest.fn();
const deleteTodo = jest.fn();

test('Todo list item not to be rendered when todo prop has value null', () => {
  render(<TodoItem todo={null} />);
  expect(screen.queryByTestId('todo-list-item')).not.toBeInTheDocument();
});

let renderUtils; // highlight-line

describe('Todo List Item', () => {
  beforeEach(() => {
    renderUtils = render(  // highlight-line
      <TodoItem
        todo={mockedTodo}
        markCompleted={markCompleted}
        deleteTodo={deleteTodo}
      />)
  });

  afterEach(() => {
    markCompleted.mockClear();
    deleteTodo.mockClear();
  });

  test("Todo is marked completed on checkbox click", () => {
    const { debug, rerender } = renderUtils; // highlight-line
    const checkbox = screen.getByLabelText(mockedTodo.content);
    fireEvent.click(checkbox);

    expect(markCompleted).toHaveBeenCalledTimes(1);
    expect(markCompleted).toHaveBeenCalledWith(mockedTodo.id);
    expect(checkbox).toBeChecked();

    debug(screen.getByTestId('todo-row')); // highlight-line
    expect(screen.getByTestId('todo-row')).toHaveClass('checked');
  });

  test("Todo item to be deleted on click of delete button", () => {
    const deleteBtn = screen.getByTestId("delete-btn");
    fireEvent.click(deleteBtn);

    expect(deleteTodo).toHaveBeenCalledTimes(1);
    expect(deleteTodo).toHaveBeenCalledWith("1234");
  });
})
We first assign the object that returns from the render method to a variable renderUtils and we then use that within the test to destructure the properties.
Although the debug step is not necessary, I wanted to show how useful this is. Instead of adding console.logs, you can use debug on any element and see the markup that is visible in the terminal. The above debug line gives us this output -
console.log node_modules/@testing-library/react/dist/pure.js:94
    <div
      class="ui checkbox "
      data-testid="todo-row"
    >
      <input
        id="1234"
        type="checkbox"
      />
      <label
        data-testid="todo-label"
        for="1234"
      >
        grocery
      </label>
    </div>
Now let's try to make this test pass so we can move on. Here's how you can rerender the component -
test("Todo is marked completed on checkbox click", () => {
  const { debug, rerender } = renderUtils;
  const checkbox = screen.getByLabelText(mockedTodo.content);
  fireEvent.click(checkbox);

  expect(markCompleted).toHaveBeenCalledTimes(1);
  expect(markCompleted).toHaveBeenCalledWith(mockedTodo.id);
  expect(checkbox).toBeChecked();

  rerender(<TodoItem todo={{ ...mockedTodo, completed: true }} />) // highlight-line
  expect(screen.getByTestId('todo-row')).toHaveClass('checked');
});
Just before making the last assertion, we rerender the component with the updated todo prop with the completed: true property. Now, we will see that the element does infact have our class checked.
While we are here, there are couple of refactors we can do within this test. Remember, the render method also returns back the queries? We can use them instead of using queries from the screen object.
test("Todo is marked completed on checkbox click", () => {
  const { rerender, getByLabelText, getByTestId } = renderUtils; // highlight-line
  const checkbox = getByLabelText(mockedTodo.content); // highlight-line
  fireEvent.click(checkbox);

  expect(markCompleted).toHaveBeenCalledTimes(1);
  expect(markCompleted).toHaveBeenCalledWith(mockedTodo.id);
  expect(checkbox).toBeChecked();

  rerender(<TodoItem todo={{ ...mockedTodo, completed: true }} />)
  expect(getByTestId('todo-row')).toHaveClass('checked'); // highlight-line
});
Now when we run our tests in the coverage mode, you will notice that we now have 100% coverage. Awesome!
With regards to the component testing, we have covered almost everything that you would normally come across. The only thing left is making async calls, which I intend to cover in one of the future posts.
For our last component, <Completed />, since its a read-only component and the only tests that we need to add are for the text changes based on the number of todos, I would recommend you go through the code and look for completed.js file under __tests__ directory.